
티스토리 뷰
아래 파일은 vagrant 파일입니다.
해당 파일을 복사해서 Vagrantfile edit 로 만들어서 window cmd 창에서
#Vagrantfile 을 vagrant up 을 실행합니다.
d:>Vagrant up
==> vagrant: A new version of Vagrant is available: 2.3.0 (installed version: 2.2.19)!
==> vagrant: To upgrade visit: https://www.vagrantup.com/downloads.html

Bringing machine 'k8s5-m' up with 'virtualbox' provider...
Bringing machine 'k8s5-w1' up with 'virtualbox' provider...
Bringing machine 'k8s5-w2' up with 'virtualbox' provider...
==> k8s5-m: Box 'ubuntu/focal64' could not be found. Attempting to find and install...
    k8s5-m: Box Provider: virtualbox
    k8s5-m: Box Version: 20210831.0.0
==> k8s5-m: Loading metadata for box 'ubuntu/focal64'
    k8s5-m: URL: https://vagrantcloud.com/ubuntu/focal64
==> k8s5-m: Adding box 'ubuntu/focal64' (v20210831.0.0) for provider: virtualbox
    k8s5-m: Downloading: https://vagrantcloud.com/ubuntu/boxes/focal64/versions/20210831.0.0/providers/virtualbox.box
Download redirected to host: cloud-images.ubuntu.com
    k8s5-m:
==> k8s5-m: Successfully added box 'ubuntu/focal64' (v20210831.0.0) for 'virtualbox'!
==> k8s5-m: Preparing master VM for linked clones...
    k8s5-m: This is a one time operation. Once the master VM is prepared,
    k8s5-m: it will be used as a base for linked clones, making the creation
    k8s5-m: of new VMs take milliseconds on a modern system.
==> k8s5-m: Importing base box 'ubuntu/focal64'...
==> k8s5-m: Cloning VM...
==> k8s5-m: Matching MAC address for NAT networking...
아래 파일은 Vagrantfile 입니다.
# Base Image
BOX_IMAGE = "ubuntu/focal64"
BOX_VERSION = "20210831.0.0"

# max number of worker nodes
N = 2

# ssh config
$ssh_config = <<-SCRIPT
  echo ">>>> root password <<<<<<"
  printf "qwe123\nqwe123\n" | passwd

  echo ">>>> ssh-config <<<<<<"
  sed -i "s/^PasswordAuthentication no/PasswordAuthentication yes/g" /etc/ssh/sshd_config
  sed -i "s/^#PermitRootLogin prohibit-password/PermitRootLogin yes/g" /etc/ssh/sshd_config
  systemctl restart sshd
SCRIPT

Vagrant.configure("2") do |config|
#-----Manager Node
    config.vm.define "k8s5-m" do |subconfig|
      subconfig.vm.box = BOX_IMAGE
      config.vm.box_version = BOX_VERSION
      subconfig.vm.provider "virtualbox" do |v|
        v.name = "k8s5-m"
        v.memory = 8192
        v.cpus = 4
        v.linked_clone = true
      end
      subconfig.vm.hostname = "k8s5-m"
      subconfig.vm.synced_folder "./", "/vagrant", disabled: true
      subconfig.vm.network "private_network", ip: "192.168.100.10"
      subconfig.vm.network "forwarded_port", guest: 22, host: 50010, auto_correct: true, id: "ssh"
      subconfig.vm.provision "shell", inline: $ssh_config
      subconfig.vm.provision "shell", path: "https://raw.githubusercontent.com/gasida/DKOS/main/2/init_cfg.sh", args: N
      subconfig.vm.provision "shell", path: "https://raw.githubusercontent.com/gasida/DKOS/main/2/master.sh"
    end

#-----Worker Node
  (1..N).each do |i|
    config.vm.define "k8s5-w#{i}" do |subconfig|
      subconfig.vm.box = BOX_IMAGE
      config.vm.box_version = BOX_VERSION
      subconfig.vm.provider "virtualbox" do |v|
        v.name = "k8s5-w#{i}"
        v.memory = 8192
        v.cpus = 4
        v.linked_clone = true
      end
      subconfig.vm.hostname = "k8s5-w#{i}"
      subconfig.vm.synced_folder "./", "/vagrant", disabled: true
      subconfig.vm.network "private_network", ip: "192.168.100.10#{i}"
      subconfig.vm.network "forwarded_port", guest: 22, host: "5001#{i}", auto_correct: true, id: "ssh"
      subconfig.vm.provision "shell", inline: $ssh_config
      subconfig.vm.provision "shell", path: "https://raw.githubusercontent.com/gasida/DKOS/main/2/init_cfg.sh", args: N
      subconfig.vm.provision "shell", path: "https://raw.githubusercontent.com/gasida/DKOS/main/2/worker.sh"
    end
  end

end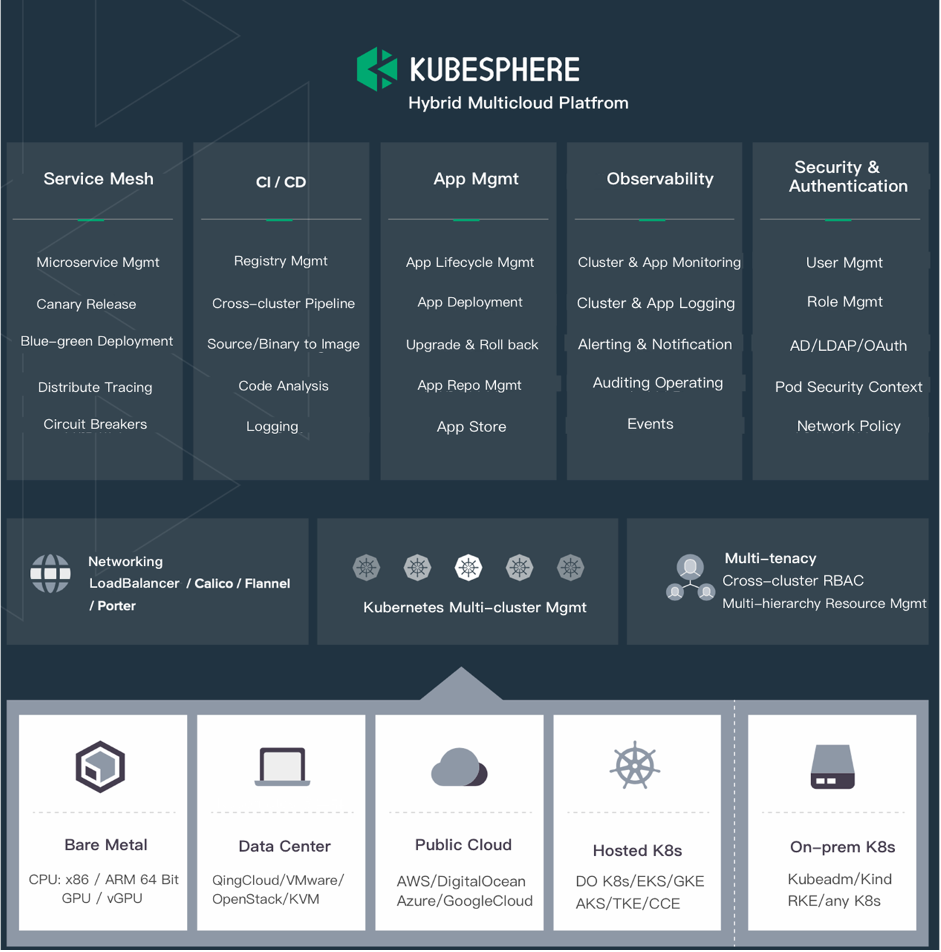
AWS Multi-Account, Multi-Cluster Kubernetes 환경을 구성하면서 EKS Cluster을 관리하고 유지하기 위한 툴이 필요하게 되었습니다. 다양한 오픈소스 중에 아래의 두 가지 툴을 검토하게 되었습니다.
- Lens | The Kubernetes IDE (https://k8slens.dev/)
- KubeSphere (https://kubesphere.io/)
현재 회사에서 보안 접근 제어가 필요하고, PC에 설치하는 것보다는 Web Console로 접근을 선호 해서 KubeSphere를 먼저 검토를 하게 되었습니다.
KubeSphere 란 무엇인가?
클라우드 네이티브 애플리케이션을 관리 하기 위한 오픈소스 분산 운영 체제입니다. Kubernetes 를 커널로 사용하는 KubeSphere는 타사 애플리케이션의 원활한 통합을 위한 플러그 앤 플레이 아키텍처를 제공합니다.
- 개발자 친화적인 웹 UI를 제공
- Kubernetes 리소스 관리
- DevOps (CI / CD)
- 애플리케이션 수명 주기 관리
- 모니터링, 로깅, 서비스 메시, 다중 테넌시, 경고 및 알림, 스토리지 및 네트워킹, 자동 확장, 액세스 제어, GPU 지원 등은 물론 다중 클러스터 관리, 네트워크 정책, 레지스트리 관리 지원
https://kubesphere.io/images/docs/introduction/what-is-kubesphere/architecture-1.png
KubeSphere 설치 (Single-node Installation)
설치 방식은 두 가지를 지원합니다. k8s 또는 Bare Metal에 구성이 가능합니다. 이번에는 Single Kubernetes 환경에 KubeSphere를 설치해 보겠습니다.
AWS EC2 1대를 생성 해서 KubeShere를 구성해 보도록 하겠습니다. (Ubuntu 18.04, t3.xlarge 타입)
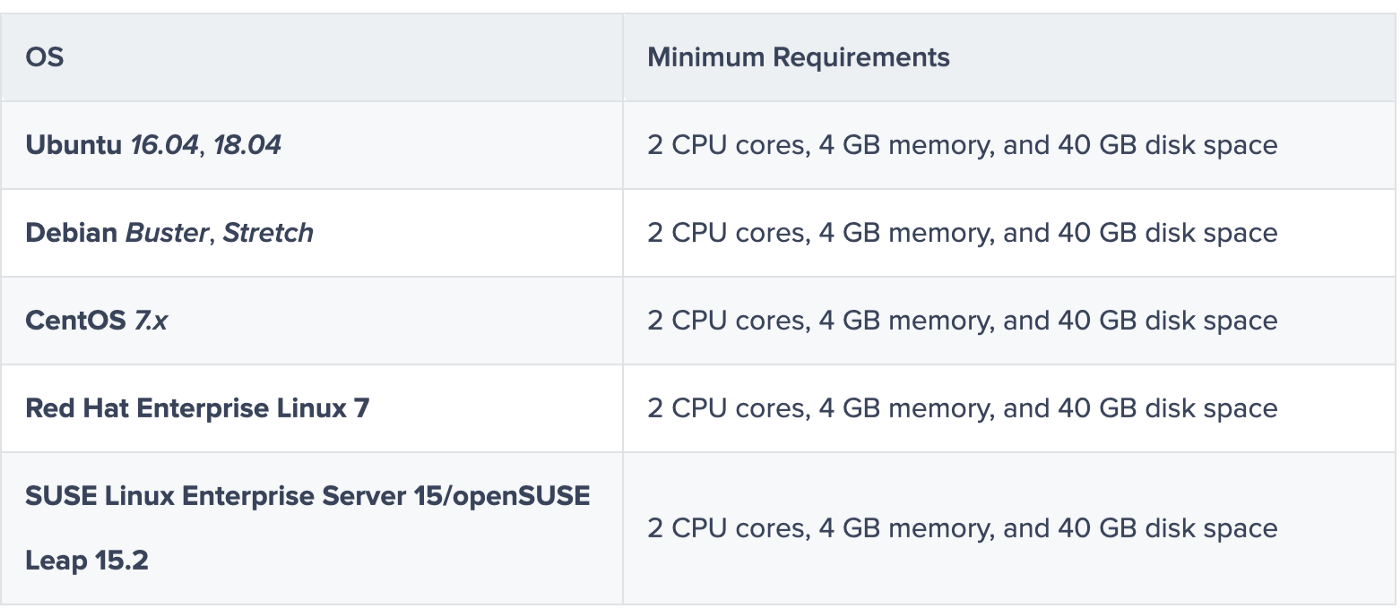
Hardware Recommendations
Setp 1: Download KubeKey
KubeSphere 를 Public Cloud 환경 및 데이터 센터에서 설치가 편리하도록 KubeKey 툴을 제공합니다. KubeKey 명령어를 통해서 Kubernetes만 설치하거나 KubeSphere와 Kubernetes를 모두 설치할 수 있습니다. 여기에서는 둘 다 설치를 하도록 하겠습니다.
# Dependency requirements 패키지는 아래와 같습니다.
sudo apt-get update -y
sudo apt-get install -y conntrack
sudo apt-get install -y socat
sudo apt-get install -y ipset# KubeSphere 설치를 위해서는 root로 실행이 되어야 합니다.
sudo su -
curl -sfL https://get-kk.kubesphere.io | VERSION=v1.1.1 sh -
chmod +x kk
Setp 2: Get Started with installation
아래의 명령어를 통해서 Kuberentes 환경을 설치하고 KubeSphere 구성하도록 하겠습니다.
k8s 버전은 1.21.4 버전 입니다.
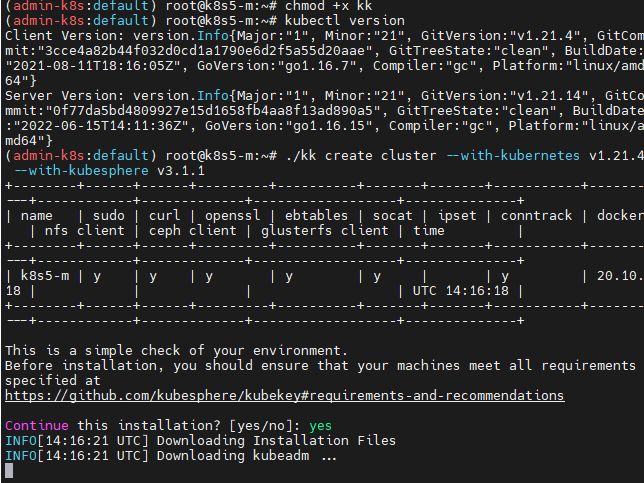
./kk create cluster --with-kubernetes v1.20.4 --with-kubesphere v3.1.1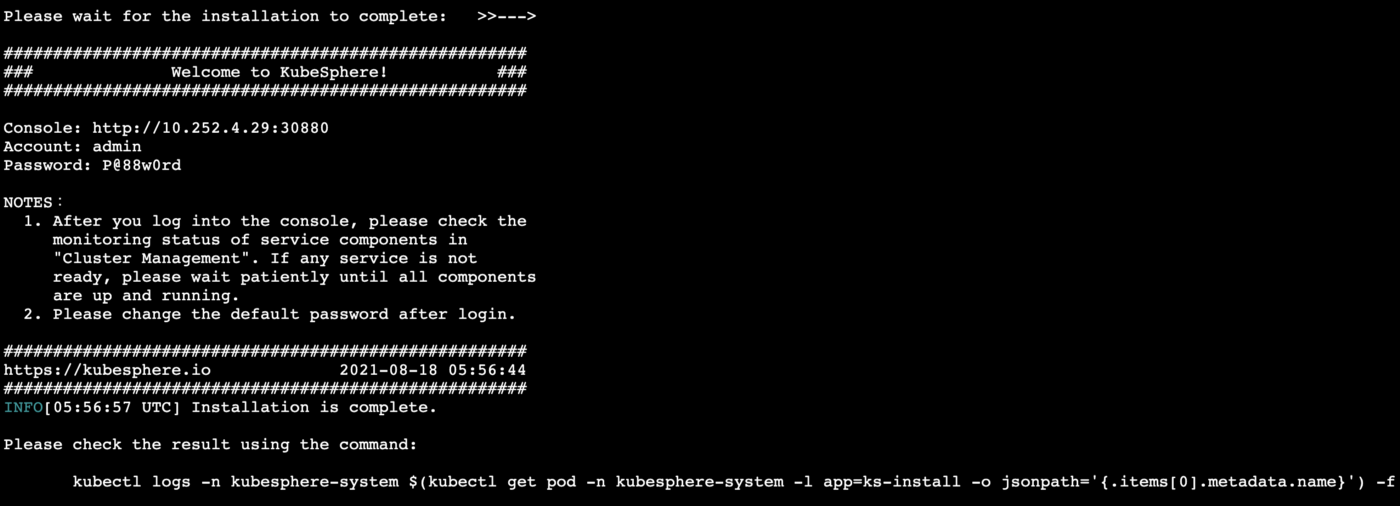
Step 3: Verify the Installation
아래의 명령어를 실행하시면 현재 KubeSphere 설치 로그를 보실 수 있습니다.
kubectl logs -n kubesphere-system $(kubectl get pod -n kubesphere-system -l app=ks-install -o jsonpath='{.items[0].metadata.name}') -f
해당 서버의 IP 와 30880으로 접속 후 로그인하시면 아래와 같은 화면을 보실 수 있습니다.
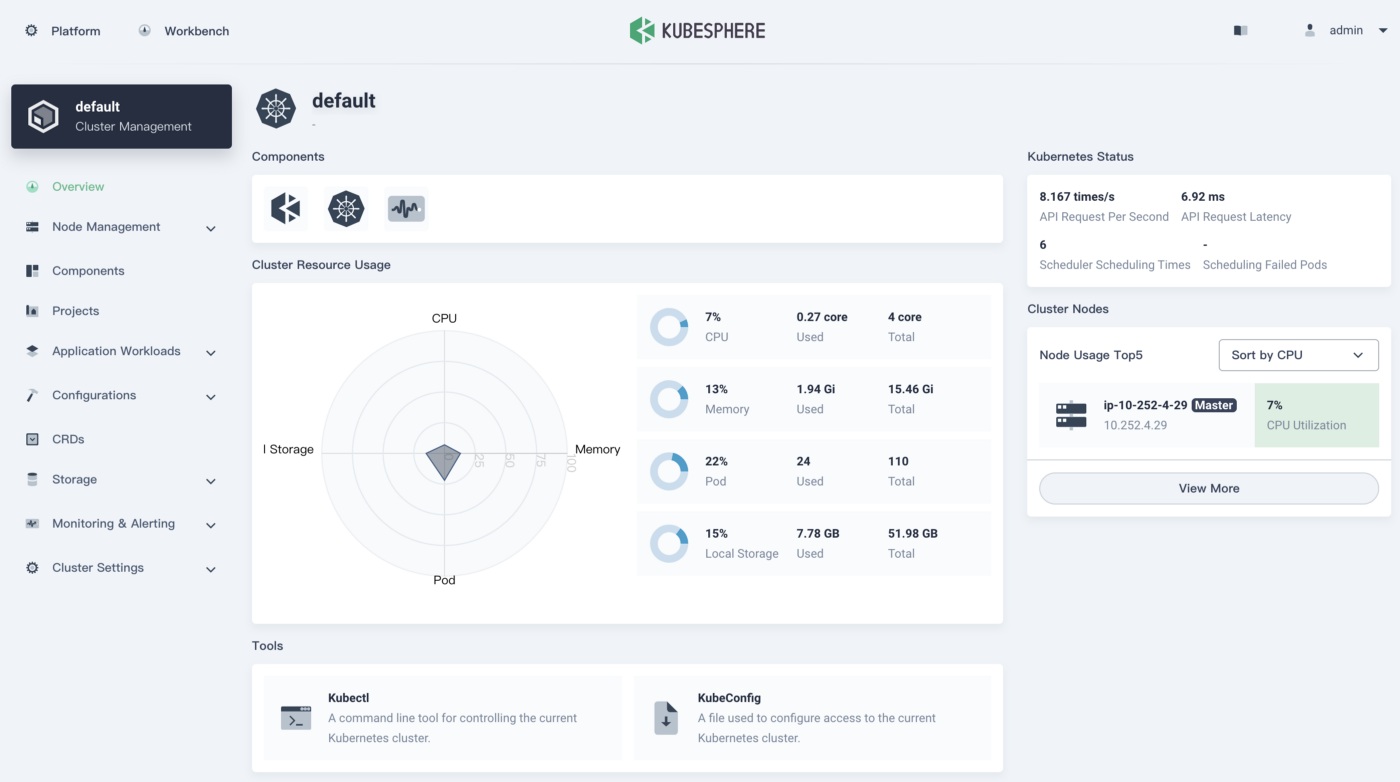
KubeSphere default 클러스터 화면
Enable Pluggable Components (Optional)
KubeSphere 설치는 기본 설치만 되며, 추가 기능을 별도로 설치해야 합니다. https://kubesphere.io/docs/pluggable-components/ 사이트에서 추가해야 합니다.
KubeSphere 설치 (Multi-node Installation)
위에서는 Single node에서 KubeSphere를 설치 방법에 대해서 알아봤습니다. 하지만 다양한 Plugin 설치하려면 Single node 한대로 부족하므로 Multi-node 환경을 구성해야 합니다. KubeSphere에 다수의 Kubernetes Cluster를 연동할수록 자원이 부족해집니다. (Kubernetes Cluster 5개 연동 시 CPU 20% 사용합니다.)
마무리
지금까지 KubeSphere 에 대해서 알아봤고, 간단하게 설치를 해봤습니다. 일단 클러스터 및 멀티 클라우드 환경에서 사용하면 괜찮을 것 같습니다. 클러스터 개수가 많다면, KubeSphere으로 한 번에 관련 내용을 확인하고 볼 수 있다는 것은 매우 좋을 것 같습니다.
- Total
- Today
- Yesterday
- 설치하기(HP-UX)
- 우분투
- 오라클 트러블 슈팅(성능 고도화 원리와 해법!)
- 스토리지 클레스
- 쿠버네티스
- 여러서버 컨트롤
- 5.4.0.1072
- MSA
- 커널
- directory copy 후 startup 에러
- Oracle
- [오라클 튜닝] sql 튜닝
- ORACLE 트러블 슈팅(성능 고도화 원리와 해법!)
- K8s
- 코로나19
- (InstantClient) 설치하기(HP-UX)
- 테라폼
- pod 상태
- ubuntu
- 오라클
- [오라클 튜닝] instance 튜닝2
- CVE 취약점 점검
- 오라클 인스턴트클라이언트(InstantClient) 설치하기(HP-UX)
- 오라클 홈디렉토리 copy 후 startup 에러
- startup 에러
- 튜닝
- 앤시블
- 버쳐박스
- 트리이스
- 키알리
| 일 | 월 | 화 | 수 | 목 | 금 | 토 |
|---|---|---|---|---|---|---|
| 1 | 2 | 3 | 4 | 5 | 6 | 7 |
| 8 | 9 | 10 | 11 | 12 | 13 | 14 |
| 15 | 16 | 17 | 18 | 19 | 20 | 21 |
| 22 | 23 | 24 | 25 | 26 | 27 | 28 |
| 29 | 30 |