
티스토리 뷰
참조 블로그 : https://velog.io/@hellonayeon/nGrinder-install-and-how-to-use-memo
설치에 앞어서 JAVA 설치 해야 합니다. 참조 URL
2023.09.14 - [분류 전체보기] - 우분투(Ubuntu)에서 터미널로 JAVA 설치하기

Grinder
nGrinder란 네이버에서 진행한 오픈 소스 프로젝트로 서버의 부하 테스트를 위한 도구 이다. 웹 애플리케이션을 서비스하기 전에 서버가 얼마나 많은 사용자를 수용할 수 있는지 요청을 전송해봄으로써 서버의 성능을 측정해볼 수 있다.
nGrinder는 Controller와 Agent로 이루어져 있다.
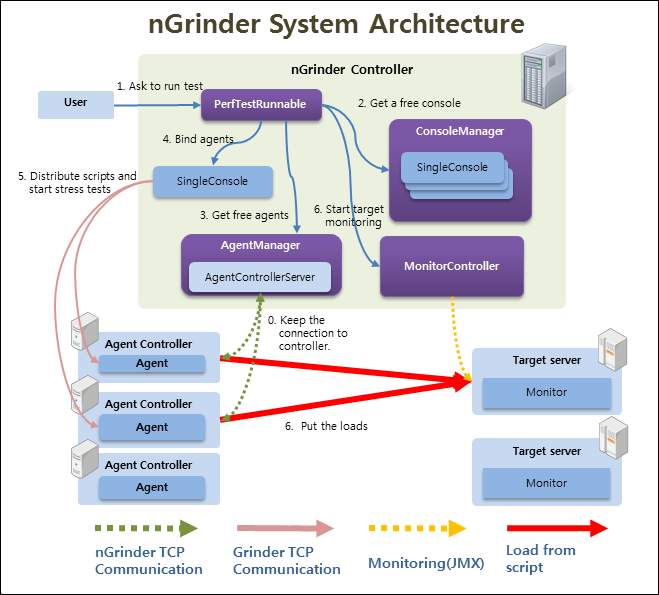
✔️ Controller
  ├── 성능 측정을 위한 웹 인터페이스 제공
  ├── 테스트 프로세스 조정
  ├── 테스트 통계를 수집하고 표시
  └── 스크립트 수정 기능 제공

✔️ Agent
  ├── 에이전트 모드에서 실행할 때 대상 시스템에 부하를 주는 프로세스 및 스레드를 실행
  └── 모니터 모드에서 실행 시 대상 시스템 성능(CPU/메모리) 모니터링
설치
- Controller 설치
nGrinder 릴리스 페이지에서 WAR 파일을 다운로드 할 수 있다.
$ mkdir ngrinder
$ cd ngrinder
$ wget https://github.com/naver/ngrinder/releases/download/ngrinder-3.5.5-p1-20210531/ngrinder-controller-3.5.5-p1.war| # mkdir ngrinder # cd ngrinder/ # wget https://github.com/naver/ngrinder/releases/download/ngrinder-3.5.5-p1-20210531/ngrinder-controller-3.5.5-p1.war # java -jar ngrinder-controller-3.5.5-p1.war --port 7070 |
# java -jar ngrinder-controller-3.5.5-p1.war --port 7070
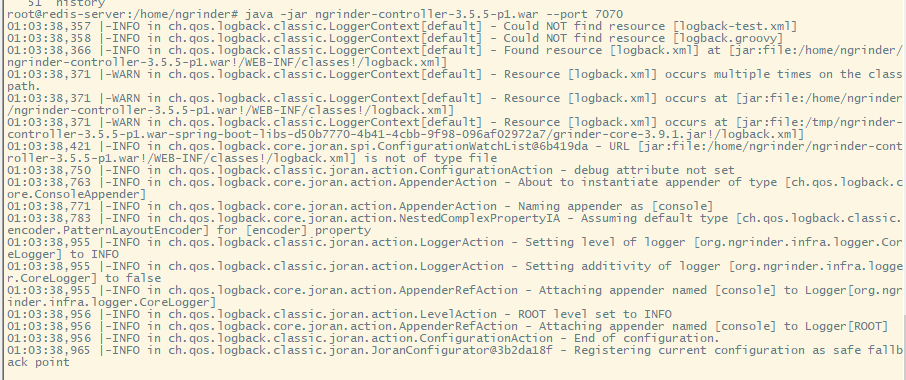
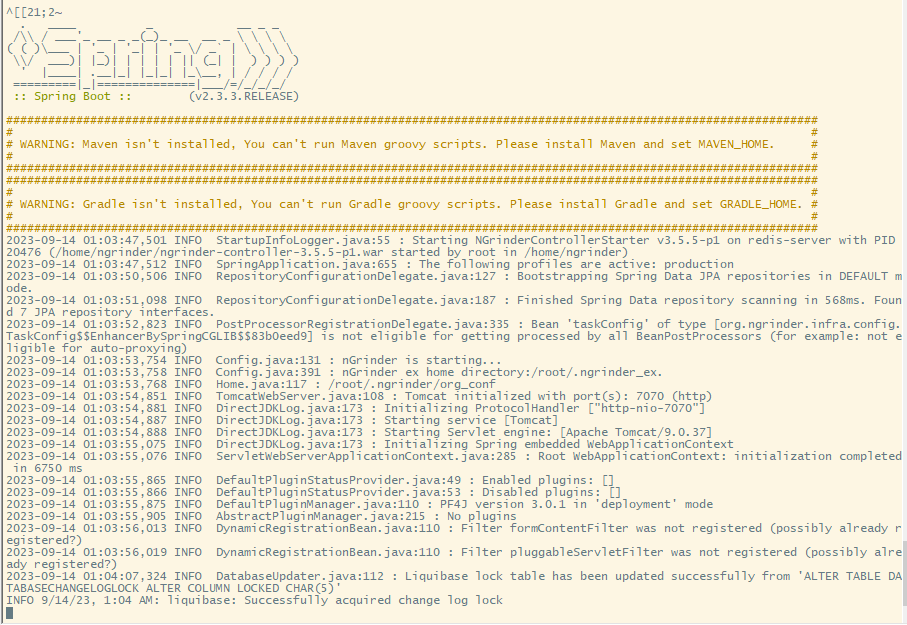
Controller 실행
java -jar ngrinder-controller-3.5.5-p1.war --port 7070 - 사이트 확인
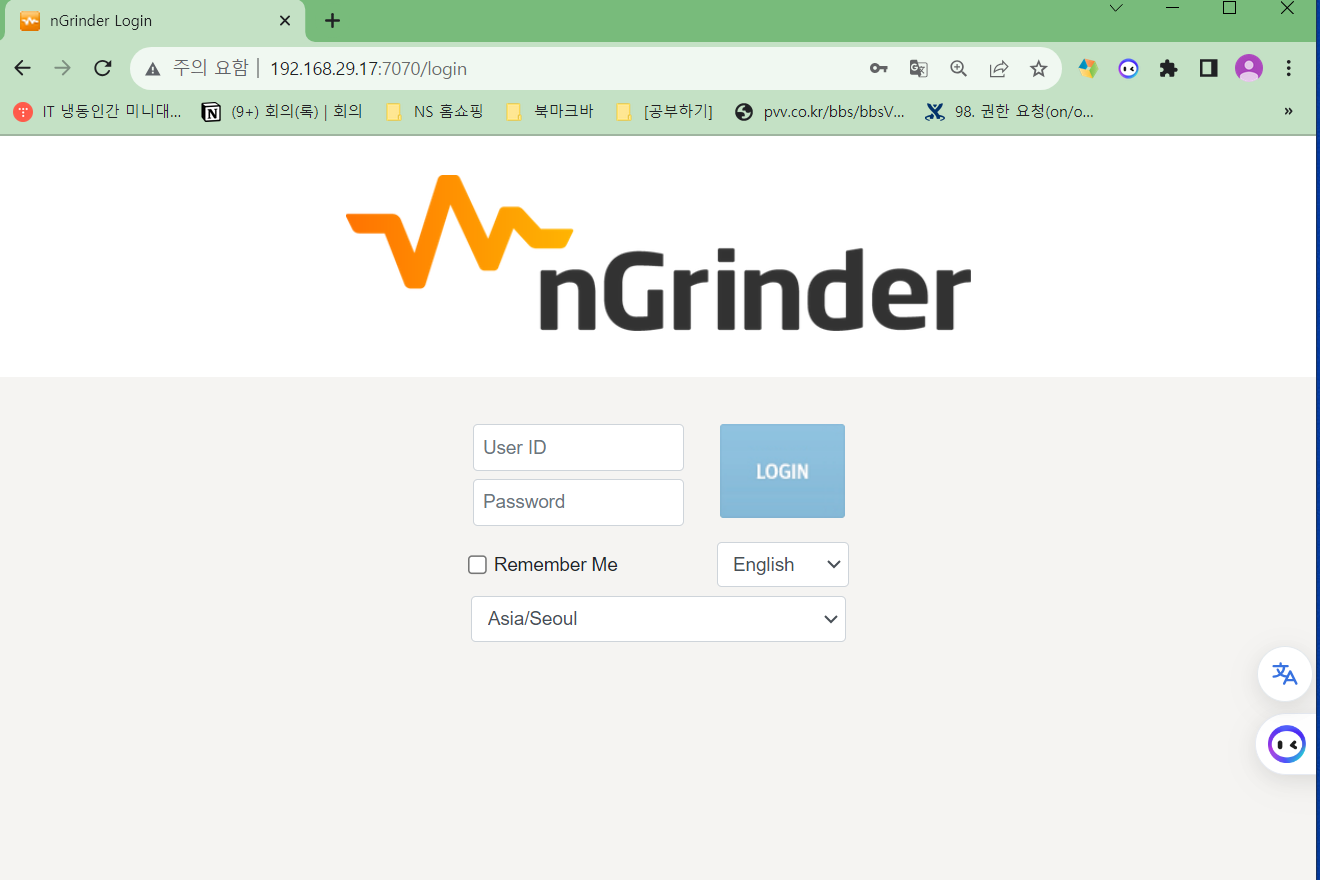
Controller를 실행한 포트 번호로 브라우저 주소창에 http://localhost:[포트번호]/login를 입력하면 아래와 같은 화면을 확인할 수 있고, 초기 아이디와 패스워드는 admin admin이다.
- Agent 설치
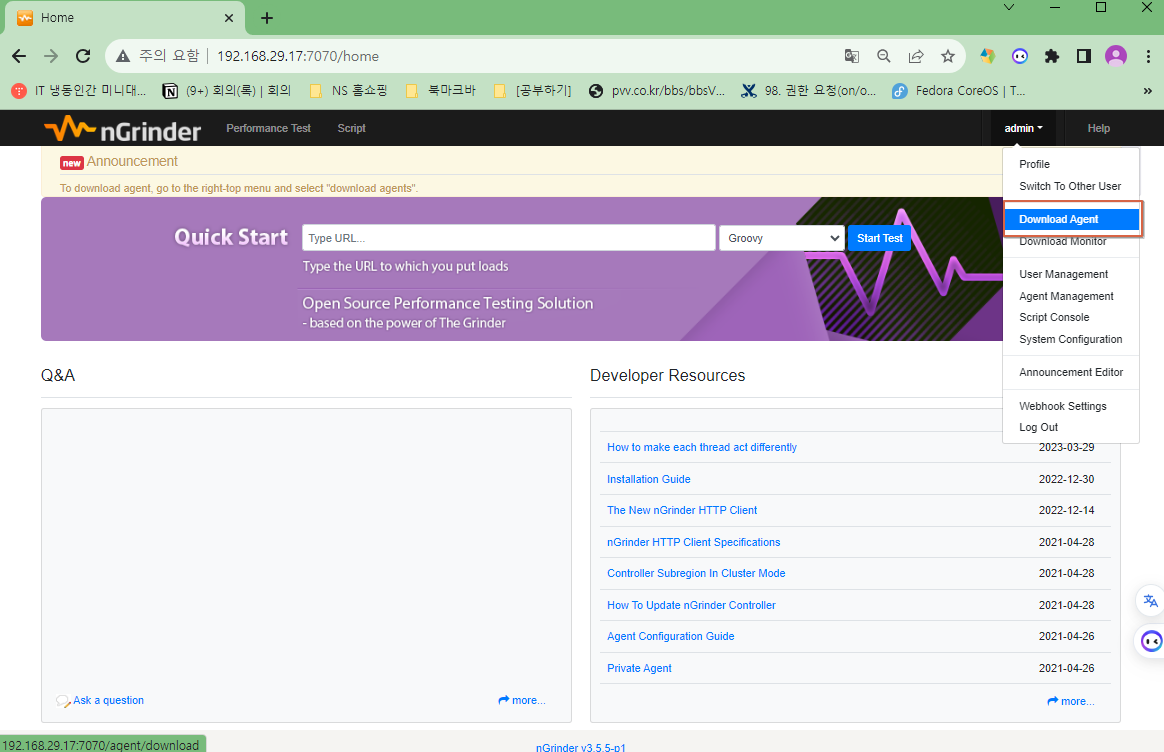
사이트에 로그인 한 후 메뉴에서 admin > Download Agent를 클릭하면 Agent 압축 파일이 다운로드 되고, 완료 후에 압축을 풀어준다.
tar -xvf ngrinder-agent-3.5.5-p1-192.168.29.17.tar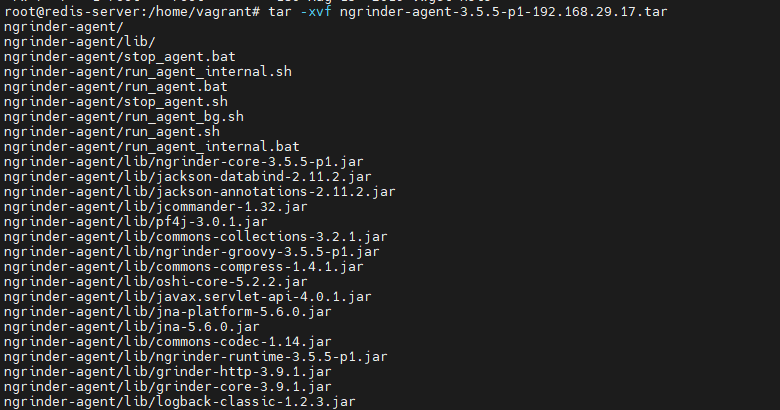
- Agent 설정파일 수정
현재는 Controller를 로컬에 두어 수정할 필요 없었지만, 나중에 클라우드에 nGrinder 환경을 설정한다면 agent.controller_host=localhost 부분을 수정해줘야한다.
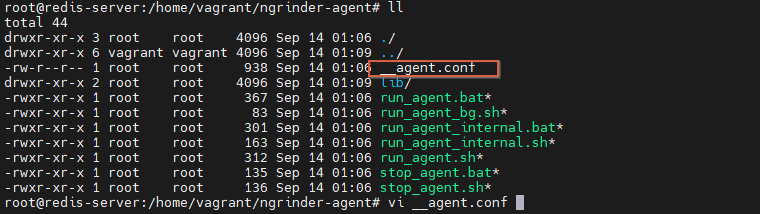
$ cd ngrinder-agent

$ vi __agent.conf

common.start_mode=agent
agent.controller_host=localhost
agent.controller_port=16001
agent.region=NONE
Agent 실행
$ ./run_agent.sh
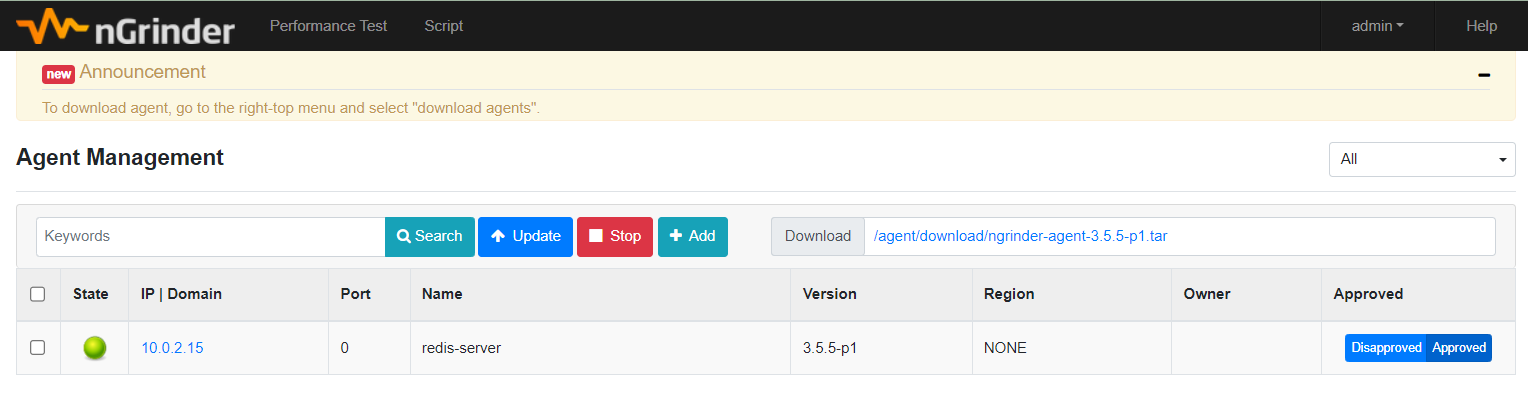
agent 가 정상적으로 실행되고 잘 등록되었는지 admin > Agent Management에서 확인 가능하다.
API 호출 테스트
API 호출을 테스트하기 위해서는 Script를 작성해야한다. 어떤 REST API로 요청을 보낼 것인지 설정해준다.

Validation을 통해 Groovy로 작성한 테스트 코드를 실행시키며, 테스트 결과를 통해 요청이 정상적으로 날아갔는지 확인할 수 있다.
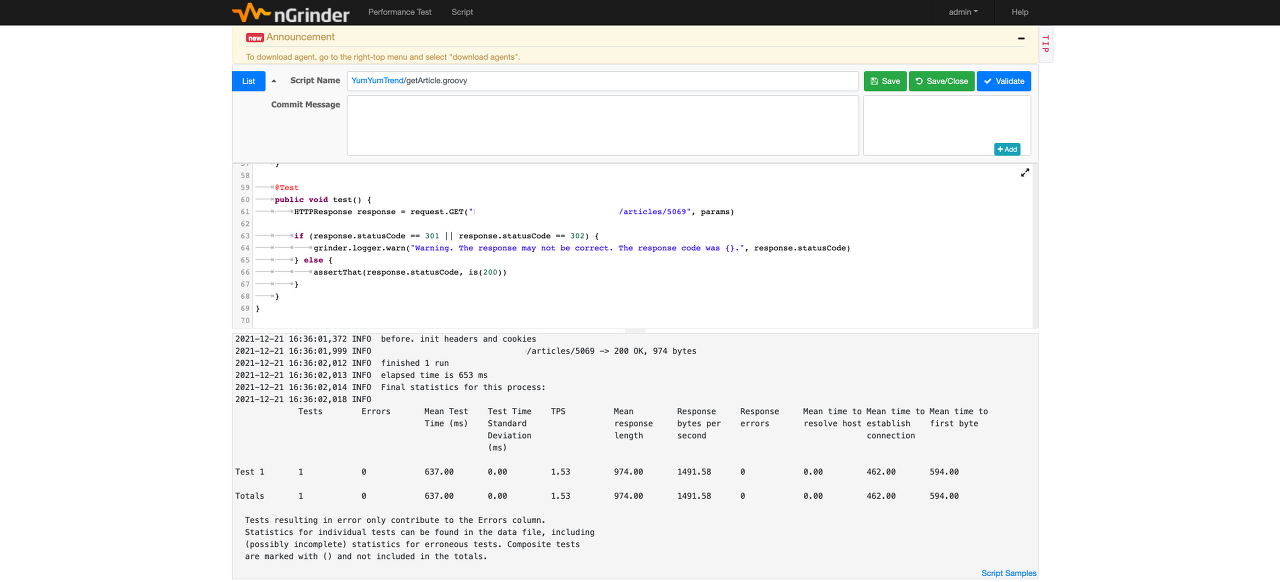
Script를 생성하면 기본적으로 아래와 같이 Script가 작성되어있다. 경우에 따라 요청 메시지에 들어가는 파라미터와 헤더, 쿼리를 수정할 수 있다. POST 요청의 경우 바디에 내용이 담겨야 하니 테스트 코드의 수정이 필요해 보인다.
import static net.grinder.script.Grinder.grinder
import static org.junit.Assert.*
import static org.hamcrest.Matchers.*
import net.grinder.script.GTest
import net.grinder.script.Grinder
import net.grinder.scriptengine.groovy.junit.GrinderRunner
import net.grinder.scriptengine.groovy.junit.annotation.BeforeProcess
import net.grinder.scriptengine.groovy.junit.annotation.BeforeThread
// import static net.grinder.util.GrinderUtils.* // You can use this if you're using nGrinder after 3.2.3
import org.junit.Before
import org.junit.BeforeClass
import org.junit.Test
import org.junit.runner.RunWith

import org.ngrinder.http.HTTPRequest
import org.ngrinder.http.HTTPRequestControl
import org.ngrinder.http.HTTPResponse
import org.ngrinder.http.cookie.Cookie
import org.ngrinder.http.cookie.CookieManager

/**
* A simple example using the HTTP plugin that shows the retrieval of a single page via HTTP.
*
* This script is automatically generated by ngrinder.
*
* @author admin
*/
@RunWith(GrinderRunner)
class TestRunner {

	public static GTest test
	public static HTTPRequest request
	public static Map<String, String> headers = [:]
	public static Map<String, Object> params = [:]
	public static List<Cookie> cookies = []

	@BeforeProcess
	public static void beforeProcess() {
		HTTPRequestControl.setConnectionTimeout(300000)
		test = new GTest(1, "127.0.0.1")
		request = new HTTPRequest()
		grinder.logger.info("before process.")
	}

	@BeforeThread
	public void beforeThread() {
		test.record(this, "test")
		grinder.statistics.delayReports = true
		grinder.logger.info("before thread.")
	}

	@Before
	public void before() {
		request.setHeaders(headers)
		CookieManager.addCookies(cookies)
		grinder.logger.info("before. init headers and cookies")
	}

	@Test
	public void test() {
		HTTPResponse response = request.GET("http://127.0.0.1:8080/articles/5069", params)

		if (response.statusCode == 301 || response.statusCode == 302) {
			grinder.logger.warn("Warning. The response may not be correct. The response code was {}.", response.statusCode)
		} else {
			assertThat(response.statusCode, is(200))
		}
	}
}
성능 측정
사이트 상단 메뉴Performance Test를 사용하면 서버의 성능을 테스트할 수 있다.
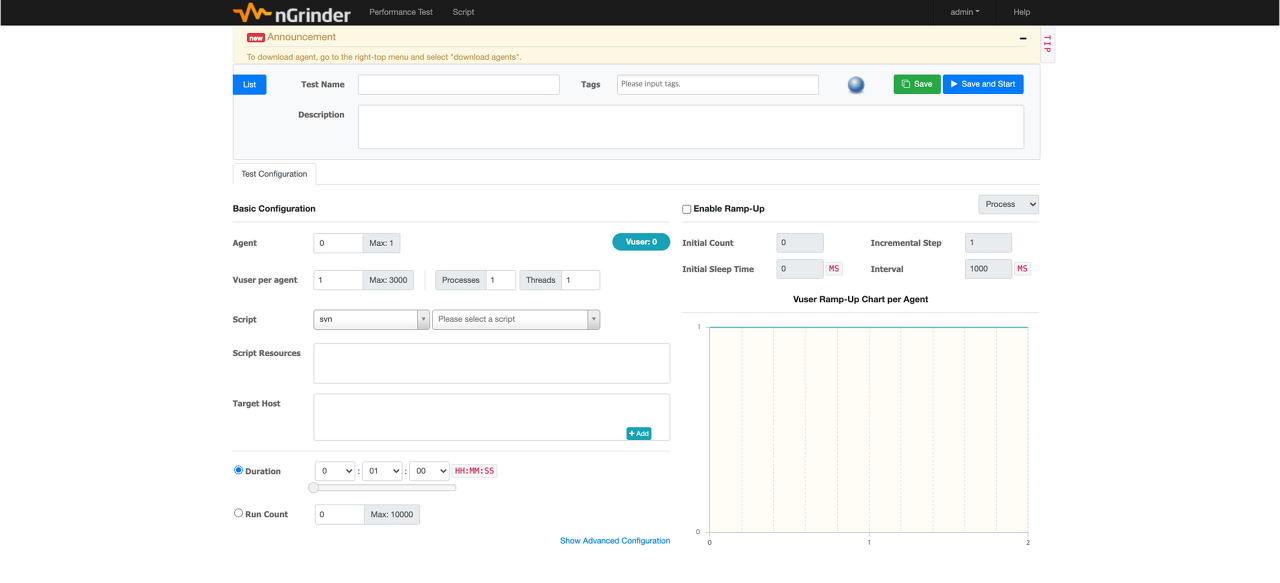
📝 설정 속성
✔️ Agent
  ├── 성능 측정에 사용할 Agent 개수
  └── Agent를 여러개로 구성하고 싶은 경우 클라우드 서비스 이용하기
      └── 여러개의 인스턴스를 생성해서 Agent 설치하기

✔️ Vuser per agent
  ├── Agent 당 설정할 가상 사용자 수
  └── 동시에 요청을 날리는 사용자 수를 의미

✔️ Process / Thread
  └── 하나의 Agent에서 생성할 프로세스와 스레드 개수

✔️ Script
  ├── 성능 측정 시 각 Agent에서 실행할 스크립트
  └── 앞서 API 호출 과정에서 생성한 Script를 연결(.groovy)하거나 Github에서 가져올 수 있다.

✔️ Duration (HH:MM:SS)
   └── 성능 측정 수행 시간

✔️ Run Count
   └── 스레드 당 테스트 코드를 수행하는 횟수


✔️ Enable Ramp-Up
  └── 성능 측정 과정에서 가상 사용자를 점진적으로 늘리도록 활성화

✔️ Initial Count
  └── 처음 시작 시 가상 사용자 수

✔️ Initial Sleep Time
  └── 테스트 시작 시간

✔️ Incremental Step
  └── Process 또는 Thread를 증가시키는 개수

✔️  Interval
  └── Process 또는 Thread를 증가시키는 시간 간격
- Total
- Today
- Yesterday
- MSA
- 오라클 인스턴트클라이언트(InstantClient) 설치하기(HP-UX)
- 앤시블
- (InstantClient) 설치하기(HP-UX)
- [오라클 튜닝] sql 튜닝
- 우분투
- 테라폼
- 버쳐박스
- 5.4.0.1072
- 여러서버 컨트롤
- 스토리지 클레스
- 커널
- startup 에러
- K8s
- 오라클 트러블 슈팅(성능 고도화 원리와 해법!)
- directory copy 후 startup 에러
- Oracle
- [오라클 튜닝] instance 튜닝2
- ORACLE 트러블 슈팅(성능 고도화 원리와 해법!)
- 코로나19
- CVE 취약점 점검
- 튜닝
- pod 상태
- 키알리
- 설치하기(HP-UX)
- 쿠버네티스
- ubuntu
- 트리이스
- 오라클
- 오라클 홈디렉토리 copy 후 startup 에러
| 일 | 월 | 화 | 수 | 목 | 금 | 토 |
|---|---|---|---|---|---|---|
| 1 | 2 | 3 | 4 | |||
| 5 | 6 | 7 | 8 | 9 | 10 | 11 |
| 12 | 13 | 14 | 15 | 16 | 17 | 18 |
| 19 | 20 | 21 | 22 | 23 | 24 | 25 |
| 26 | 27 | 28 | 29 | 30 | 31 |